Table of Contents
Using the scheduler in LUCY
Background info
LUCY allows you to schedule a campaign. Those mechanisms allow you to build an intelligent phishing campaign with multiple rules, testing user awareness in different scenarios and also different time periods. This might keep the security awareness at a high level if users know that the company performs sample phishing tests on a small group of random users over a long period.
Where to find the scheduler
Scheduler settings
LUCY comes with scheduler rules and new with a scheduler plan that allows you to verify the existing rules. Please use the following configuration tutorial to setup your scheduler:
Step 1: Preparation. The scheduler uses the local time & time zone. Therefore, you should make sure, that you have set the correct time & time zone before working with scheduler rules.
Step 2: Add Recipients to your campaign (lets say you have 2 scenarios and 1 recipient group, and then add the 1 group to both scenarios, the 1 group then will get a separate message for each scenario). If you want to distribute your 1 recipient group over multiple scenarios (so a recipient will only get 1 message for one of the both scenarios), you need to click on the checkbox "distribute users over the selected scenarios":
Step 3: Define scheduling rules.
The scheduler rules have the following options:
- Rule Type: "Repeating" vs "One Shot". Repeating Rules allow LUCY to start over the attack or awareness simulation as many times as you want. There's also a "Yearly Campaign" Rule Type, for which there's a dedicated article can be found here.
- E-Mail Type: You can define here if the rule only applies to the lure mail, the phishing attack, the awareness message or all three together (if nothing is selected)
- Start time & End Time: Defines the time ranges from beginning of email delivery until the end of email delivery. The end date will not stop the campaign. It only defines the delivery of the last message. LUCY will automatically calculate the time difference it requires to send all mails based on the number of recipients in that campaign. Example: Let’s say you have 100 users and you want to create a 6 seconds interval between the delivery, you would have to set a 10 minutes time range between start & end (e.g. set start time at 10:00 AM and end time at 10:10 AM). Once you created the scheduling rule you can use the button “build schedule plan” to confirm, that the emails will be send at the desired time and with the correct interval.
- Scenario: You can associate one or multiple scenario's for the rule.
- Repeats: You are able to specify the number of repeats for the repeating rule. For example, you set "weekly" rule and 52 repeats - it will work for 1 year. It doesn't have an end date, but it will work exactly 1 year, because there is a start date and 52 weeks in a year. The same with monthly rules - you just specify 12 repeats for a monthly rule and the rule will work for a whole year.
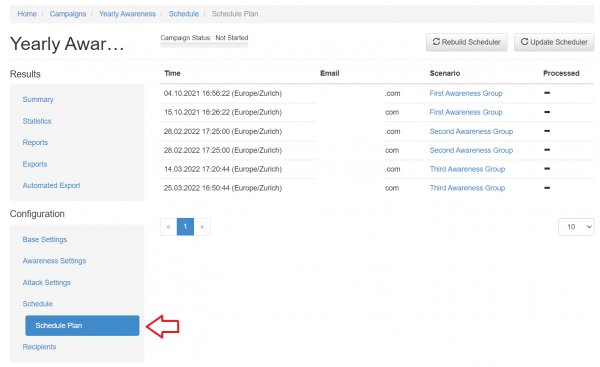
Step 4: Verify your scheduler settings. Once you build the rule(s) you can click scheduling plan and LUCY will show you which recipient will get a message when and with which scenario. This allows you to verify if the scheduler is configured as planed.
Step 5: Start your campaign. After configuring the scheduler you still need to click "START / REAL ATTACK". Lucy will then perform all the campaign based checks and send out the mails according to your scheduler settings.
Using the calculator to define your scheduler start and end time
If you want to specify a specific time frame between each mail you can use the scheduler calculator. Please enter the number of recipients, the desired gap between each email and the start time, then LUCY will automatically cerate your scheduling rule with the correct end date/time:
Time Zone & Weekend Settings
In LUCY you have the ability to create scheduling rules based on different time zones. If you specify a longer time range you can also ensure, that mails are not sent out on weekends by selecting the checkbox:
Example Configurations
Initial position: lets assume you want to setup a phishing campaign that repeats for three month. You have 6 employees split into 3 groups and 3 attack scenarios. You want to split up the 3 attack scenarios among those 3 groups in a way, that every month, an employee just gets only 1 attack scenario. After 3 months, every employee should have received 3 unique attacks.
Solution A - One Shot:
- Step 1: Create three groups under "Recipients" (each group contains 2 employees)
- Step 2: Go to your campaign, then add 3 scenarios
- Step 3: Within the campaign, go to the recipient menu and add group 1 to all three scenarios. Make sure that "Distribute users over selected scenarios" checkbox is NOT selected.
- Step 4: Repeat the last Step for the other two groups. That will create 9 group associations (3 groups x 3 scenarios)
- Step 5: Go to "Schedule" and create 1 schedule rule ("one-shot"). Choose only 1 scenario per schedule rule. Each rule starts at a different month and lasts exactly 1 month (e.g. scenario 1 = month 1, scenario 2 = month 2, scenario 3 = month 3).
- Step 6: Repeat the previous step for the remaining 2 scenarios. You will have three rules. Each rule starts at a different month. You can verify your settings if you click on "schedule plan" and have LUCY display the details of your schedule. You will see, that every user gets a different scenario at a different date. Here is as an example the scheduled attacks for user 2 from group 1:
user2_group1@company.com Scenario 1  08.2017 22:22:00 (Europe/Brussels)
user2_group1@company.com Scenario 2  09.2017 22:07:00 (Europe/Brussels)
user2_group1@company.com Scenario 3  10.2017 22:07:00 (Europe/Brussels)
The "problem" with this approach is, that LUCY will send all emails for scenario A in first month, all emails for scenario B in second month, etc. If you want more "randomisation", you can use overlaying dates in your scheduling rules (e.g. rule 1 starts at day 1 from month 1 and ends on last day of month 3, rule 2 starts middle of month 1 and ends at middle of month 2, rule 3 starts at the beginning of month 2 and ends at the second month).
Solution B - 12 Repeating Rules:
- Go to "Recipients" in your campaign. Add the recipient groups one after the other. Each time you add a recipient group you need to select all scenarios. Also make sure, that "Distribute users over selected scenarios" checkbox is NOT selected. That will add every group to all scenarios in campaign.
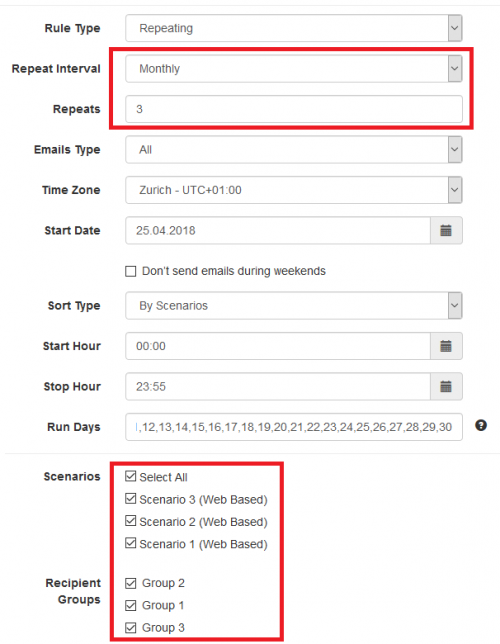
- You can create 3 scheduling rules. Choose only 1 scenario per schedule rule. Each rule should start at the same time as the other rules and last for 3 months (please set the repeat cycle to 3). It will make Lucy handle 3 rules (and tied scenarios) in parallel, resulting in 6 emails per month. The same user won't get the same email multiple times in this case (there is an important note on how scheduler works: it won't be able to add the same recipient under the same rule twice. In other words, one schedule rule is able to send message to a given recipient only once).
Solution Bi-weekly rule:
Let's assume that you need to create a plan to send emails during two months starting on the beginning of next month and sending letters proceeding only in working days.
- Step 1: Go to Campaign and choose campaign you want to schedule, choose Schedule and press "Add Rule" button.
- Step 2: Set "Rule Type": Repeating, "Repeat Interval": Weekly (to starts every week, "Repeats": 2 (to run it during two weeks)
- Step 3: Choose "Emails Types", "Time Zone" and "Start Date", mark checkbox "Don’t send emails during weekends", choose "Sort Type", Start and Stop hours and fill "Run Days" according to the day of the week the month starts with (the first day of the week is Monday; for example: the rule starting in Sept 2018 should have "Run Days" like "3,4,5,6,7,10,11,12,13,14", select "Scenarios" and press "Save" button.
Randomization
In LUCY > 4-0 we added a randomization feature, that allows you to split up your recipients over different scenario's using the scheduler.
Here is an example how this can be used: Let’s assume you want to setup a campaign over a period of 3 months as an example. The campaign has 3 scenarios and you want to test 100 users in total. Each month, you would want each user to randomly receive 1 of the 3 scenarios. Each month, each user has to receive a different one of these 3 emails so that at the end, they have all seen all 3 emails but in different months. How can this be done?
Using the randomization feature in LUCY it can be done in an easy way. The way the randomization works is, that LUCY randomly only sorts out the list of recipients in between different scenarios.
Scheduler and lure templates
Please note that the delay for the Lure message does not work if you create a single schedule rule for both attack and lure ⇒ it sends the lure immediately along with the attack. Use a separate scheduling rule for the lure attack.
Separate scheduling for multiple awareness scenarios in awareness-only campaign
Starting from Lucy 4.8 multiple awareness scenarios can be added to an awareness-only campaign. The scheduling tool is able to manage rules for different awareness scenarios as well. In order to create a Rule for a particular awareness scenario simply choose Awareness in the Email Type dropdown. Then choose Awareness Group and recipient groups bound to the attack scenario. Here you can also exclude groups from the rule in case you want different groups to receive awareness not simultaneously. Please note that the rule will be applied to all scenarios bound to Awareness Groups included.

Yearly Scheduler (automated Onboarding)
Introduction
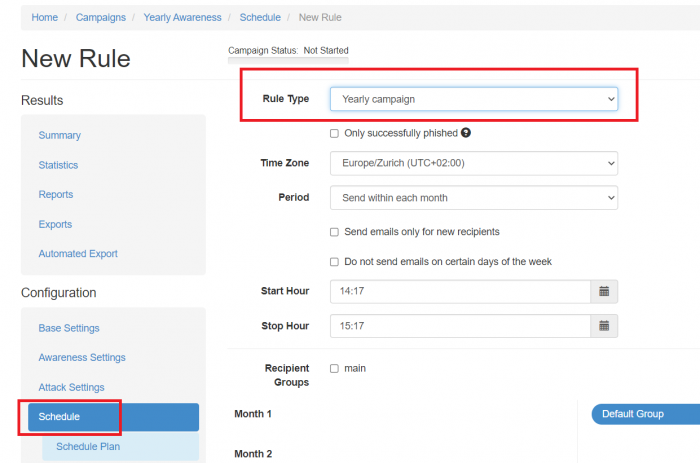
LUCY allows you to schedule a campaign. The Yearly Campaign Rule Type mechanism provides a possibility to build an intelligent phishing campaign, testing user awareness in different scenarios over a year. The campaign can be set up once and never be stopped. The only concern would be adding the recipients to an existing group. New recipients will be automatically added to the plan starting next month. This might help to keep the security awareness of the organization at a high level and to determine the level of security knowledge among the fresh new co-workers.
The Yearly Campaign feature can be found in the section:
Campaign > Schedule > Add Rule > Rule Type > Yearly campaign
The Rule Type is available for both Phishing Scenarios with included Training and Only Awareness Campaigns.
Main Settings
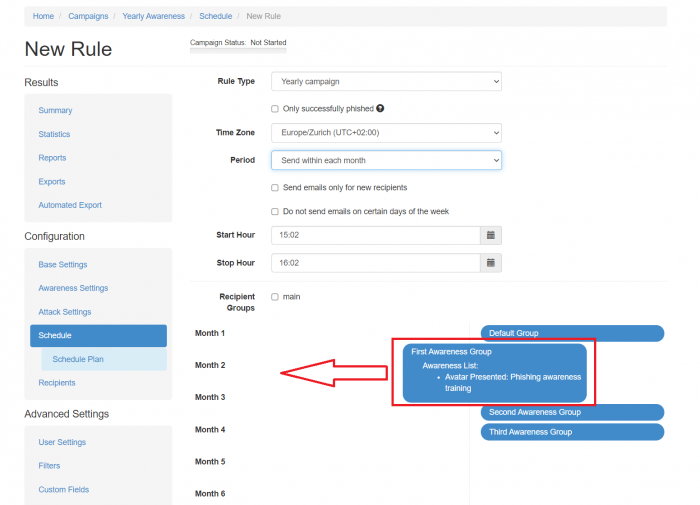
- Only successfully phished: Send awareness email only to people who were successfully phished.
- Time Zone: Specify the Time Zone for the Scheduler Rule. The scheduler uses the local time & time zone. Therefore, you should make sure, that you have set the correct time & time zone before working with scheduler rules.
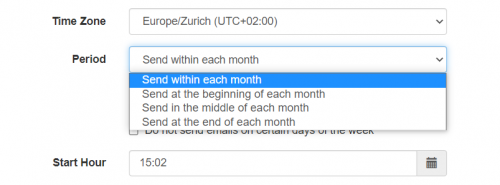
- Period: The time period of the month when the emails shall be scheduled.
Send within each month - scheduled randomly during the whole month.
Send at the beginning of each month - scheduled randomly from 1 to 9 day of the month.
Send in the middle of each month - scheduled randomly from 10 to 20 day of the month.
Send at the end of each month - scheduled randomly from 21 to end of the month.
- Send emails only for new recipients: the emails will be sent to the unprocessed recipients.
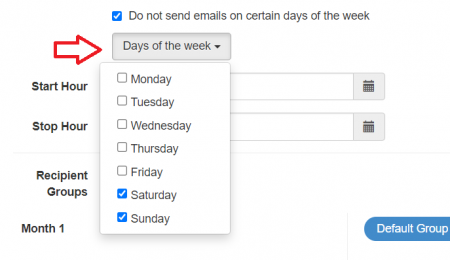
- Do not send emails on certain days of the week: determine on which days of the week the emails would not be set to the schedule. For example, select Saturday and Sunday so the recipients won't get the emails during the weekend.
- Start Hour & End Hour: define the time ranges from the beginning of email delivery until the end of email delivery. The end date will not stop the campaign. It only defines the delivery of the last message. LUCY will automatically calculate the time difference it requires to send all emails based on the number of recipients in that campaign.
The configuration of the running scenarios per month is provided by the Drag&Drop interface after the main settings.
Awareness Groups Setup
To set up several training scenarios for the campaign with a yearly scheduler the awareness groups need to be created beforehand. In this case, scenarios are bound to Awareness Groups that later also are bound to recipient groups that will receive awareness scenarios. Awareness Groups are also used by Scheduler to build rules for different scenarios.
Awareness Groups are managed under Awareness Settings > Awareness Groups. In order to create a new group simply enter the unique name and click Add.
 Awareness groups allows to group a pack of awareness by Risk Level. In case if it is necessary to send out several trainings to Risk level 0, please create an awareness group per awareness scenario, bound each scenario to a group.
To add another scenario to the awareness-only campaign proceed to Awareness Settings and click +New Awareness. Inside Scenario settings choose Awareness Groups and bind the scenario to an awareness group that you created or a default one.
As a result, you should have all the scenarios bound to awareness groups. Now it's time to bound recipients to Awareness Groups. Under Recipients, delete all existing groups and add a new one. Check Awareness Groups that recipients should receive scenarios from. Hit Save.
Scheduler now will be capable of building rules for multiple awareness scenarios.
Drag & Drop Interface
The list of available awareness and attack scenarios in the campaign is on the right side. The list of the scenarios depends on the scenarios selected for the campaign. If the campaign type is an attack, then both kinds of scenarios are present, if the campaign is awareness only, then only awareness scenarios are being displayed.
On the left side is a list of months from 1 to 12 with an unfilled list of scenarios. The month number means the month since the new recipient has been added to the existing recipient group.
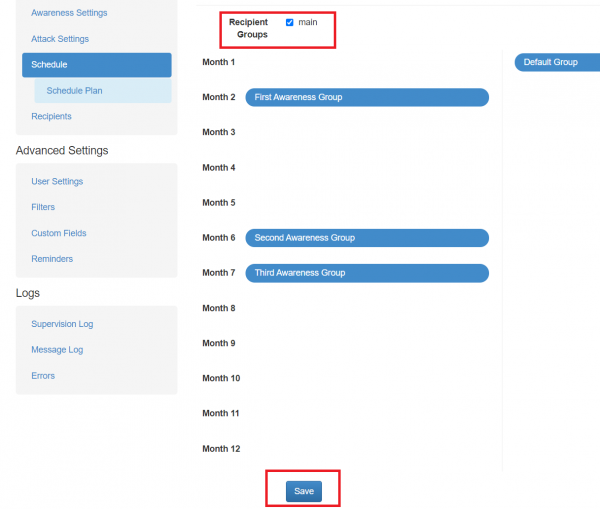
Drag a scenario from the list of scenarios (right side) to the left side and drop it over any month number. The scenario becomes visible under the corresponding month meaning that this scenario should be executed during the month according to the Scheduler Main Settings.
In case a scenario should be removed from the specific month, drag a scenario from the list of months and drop it outside this list. The scenario would disappear from the month list.
If an attack scenario is selected, there's a possibility to select an awareness scenario that should be sent in case of the recipient gets phished by the selected attack scenario.
Once the configuration is confirmed, make sure to select the recipient group and press the Save button to create the Scheduler Rule.
After that, the Scheduler Plan can be created and analyzed for this specific configuration.


