Table of Contents
Background Info
LUCY comes with an integrated e-learning tool called ADAPT. Adapt is designed to solve a problem in elearning. When you're faced with delivery to multiple devices, such as desktop, tablet, mobile, you have a choice: you can create multiple versions, each optimized for specific devices, or you can use a responsive design approach. If you create and optimise multiple versions for each device, you might build in Flash for desktop, a native app for iPhone, a different version for iPad, and Android, and so on. As you can see, this method is complex and expensive. Then when you start getting into translation and maintenance, it gets out of control pretty quickly - not to mention the tracking issues if you're trying to track data from multiple sources. Adapt gives you a different, and much simpler option. Adapt creates just one version of your elearning in HTML5, which responds intelligently to the device it is viewed on.
How to use ADAPT in LUCY?
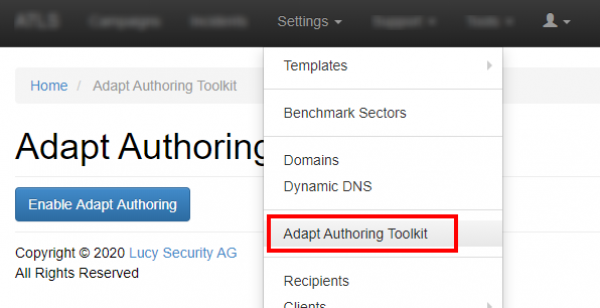
You can create your ADAPT courses in LUCY by going to the settings menu and open the ADAPT framework in a new window:
Starting with LUCY 4.4, Adapt is disabled by default. In this case, you first need to enable the framework:
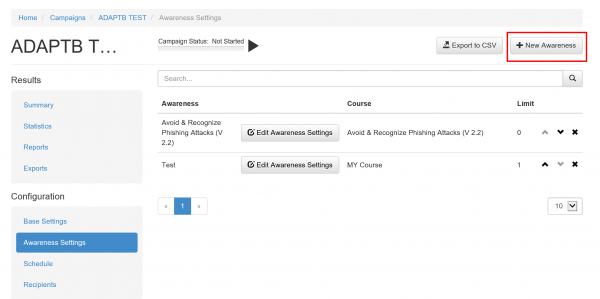
To use the previously created ADAPT course, please first add a new awareness content to your campaign by clicking "New Awareness":
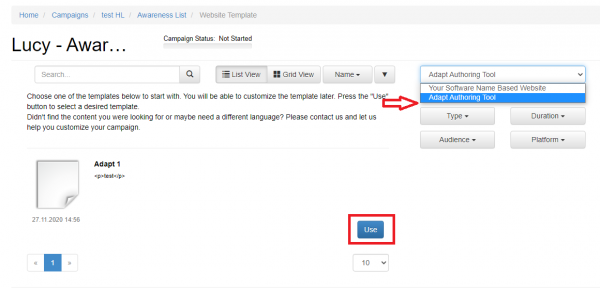
On the template page, select the option in the dropdown "Adapt Authoring Tool" as a source. If you have created a course, it will be displayed beneath and be ready to use:
Main features
Adapt allows you to build a Multi-Modal content. You can watch videos, listen to audios with transcripts, and complete quizzes. Adapt also has Multi language and localisation support
Tutorial: Adding a course
When you first load up the authoring tool, you'll see the dashboard; a display showing every course that's been created. You can organise the view of courses using the onscreen filters and search controls.
Shared courses: the default view ("My courses") will only show the courses which you have created yourself. To view any shared courses, you must click the link in the sidebar. To make a course you've authored yourself viewable in this section, you must enable the relevant option in the course's "Configuration setting" page.
To begin, click the "Add new course" button on the dashboard, give the course a title and description, choose who it should be visible to, and give it any appropriate tags (these details can be edited after the course has been created).
Once the course has been created, it should show up on the dashboard. Double click the course, or click the gear icon and then choose "Edit". This will take you into the course editor.
Once in the course editor, there are two things to notice: the sidebar at the left of the screen gives you access to many top-level configuration pages ("Configuration settings" and a "Menu picker" for example) – these are explained later, and the panel in the middle – this is the main content area.
General information
Content objects This information applies to the courses on the dashboard, pages and sub-menus in the menu editor, and all content objects in the page editor: •Objects are draggable, to allow you to easily reposition them at will •Objects have an 'actions' menu, which allows you to edit, copy, copy ID and delete •Objects can also be deleted using the trash icon to the right
Forms You'll find that most of the editor 'form' screens follow the same layout: left sidebar with save button and filters, and the main form area in the middle.
The sidebar filters allow you to hide groups of options in the current page, which is very handy for the longer pages! By default, all options are shown.
Saving Make sure you use the save button frequently to ensure you don't lose any changes!
Common fields • Display-title/title: The display title is that which is shown in the page, while the title is only shown in the Page-level progress extension's drawer. • Body: Text usually shown below the title. • Instruction: Instruction text for the current object (shown with the body text). • Classes: adds CSS classes to the object – handy if you want to add custom CSS to a single object. • Is this optional?: Whether the object should be tracked towards completion. • Is this available?: Whether the object should be displayed.
Menu Editor The first page you'll come to upon opening a course for editing is the menu editor. The menu editor shows you the top-level structure of your course. The only content items that will appear here are pages and sub-menus.
If you add a sub-menu and single-click on it, you'll notice that an extra column is added to the right. Each column represents a single 'menu' screen, with the top-level items arranged to the far left, with child items to the immediate right, and so on. There can be any number of sub-menus, and sub-menus can also be contained in other sub-menus, allowing you to create complex content hierarchies.
Page/sub-menu settings: Once you've created a page or sub-menu, you can access its settings by clicking "Edit" in its cog menu.
Page Editor Double-clicking on any of your pages will take you to the page editor screen, which gives you a visual 'wireframe' view of the page's structure.
Adding content objects If you're editing a new page, you'll find yourself with a single empty article with an empty block. If you try to preview now, you'll be given an error, as the tool won't let you publish a course with empty blocks.
Add a new component to your empty block using the "Add component" button. A sidebar will appear which allows you to select the type of component, as well as it's position within the block (i.e. left/right/full-width). Blocks can take either one full-width component, or two half-width components (one to the left and one to the right).
Once added, edit your new component by double clicking on it or by selecting "Edit" from the the cog menu. Feel free to add more articles and blocks using the relevant controls.
Once the course contains at least one page with one component, you can preview it using the sidebar button.
Moving/deleting content objects You can change the layout (i.e. left/right/full-width) of any component in your page using the layout arrows next to the component's settings cog. Certain actions may be unavailable if you have another component in the current block (e.g. you won't be able to change a component to full-width if there are two components in the block).
If you want to move a content object to a different position in the page, you can simply drag and drop. Make sure you grab the top of the content object (i.e. where it's title is) – the cursor will change to let you know you're in the right place.
If you want to get rid of any content object, you can use either its trash icon, or by the "Delete" option in its settings/cog menu. Be aware that any child objects will also be deleted, so make sure you move out everything you want to keep before you do this!
Editing course settings Each course has several different types of settings. •Project settings: contains the same settings used when creating the course, and groups content-based options, such as global button labels. •Configuration settings: contains course-wide configuration options such as the default language, the 'weighting' of each question in the greater score progress and accessibility settings.
Applying a theme To apply a theme to your course, you just need to go to the "Theme picker" page, choose your theme by clicking on it, and clicking save.
Applying a menu Setting the menu for your course is identical to applying a theme.
Viewing your course When you're ready to view your course, there are a few different functions available (found at the top of the editor's sidebar).
Preview Loads a fully functioning preview of your course in a new window.
As the course runs on a simple web server, there is no cross-session tracking (although you will get single session progress tracking). To fully test tracking, you need to either download a published version of your course, or use the scorm_test_harness.html file (see Advanced use).
More documentation
Please visit this link for more information: https://github.com/adaptlearning/adapt_authoring/wiki/Creating-a-Course


